
Free Photoshop Tutorials : Cars Fire Effect Photoshop Tutorial, An easy way to learn how to make a Car Fire Speed. For this tutorial we need a picture with a car, but the background of the image must be white. Simply follow this easy Photoshop tutorial made by Easy-Psd, we will list as much as possible tutorials from this great designer.
You can also read our previous articles like Free Fireworks Tutorial – Apple Banner Effects, how to Create Pattern Background With Brushes Photoshop Tutorial and this collection of 20 Free Typography Photoshop Text Effects Tutorials. If you found this article useful for you please share it with your friends on social networks such google+ and facebook! You can always follow us on Facebook and add us to your Google+ circles.
Cars Fire Effect Photoshop Tutorial
Tutorial author : Easy-Psd


Now create a new document(Ctrl+N). Choose any size you want but I recommend something like 800×800 or 1000×1000. Set the background color of the new document to black. Now create a new layer on the black document(Shift+Ctrl+N) , and from brushes select the earlier defined brush and apply it with a white color. You should obtain something like this:
Create a new layer(Shift+Ctrl+N) and on this layer apply the fire background (Open the fire background document , press Ctrl+A , Ctrl+C and on the car document , on the new layer press Ctrl+V .Put the layer mod to Overlay . You should obtain something like this:


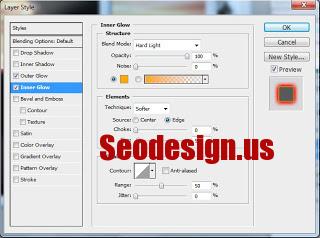
Now right click on the layer where you applied the brush and go to Blending Options and apply the following settings:
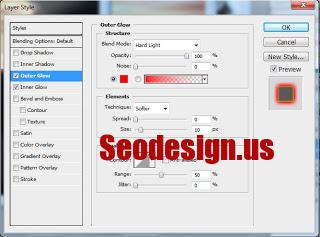
For the Outer Glow the color is #ff0000.
For the Inner Glow the color is #ffa800.
I think that the image already look very nice but we can still improve it.Go on the layer with the brush and duplicate it ( Layer-Duplicate Layer). Now your layer pallet should look like this:

Now on the “Layer 2” we will add some filters. Go to Filter-Stylize-Wind From the Left and add this filter.To repeat the filter , hit 2 or 3 times Ctrl+F. Another filter will be Filter-Blur-Motion Blur and apply it with a 90 Angle and a Distance of 10 pixels.You should obtain something like this:

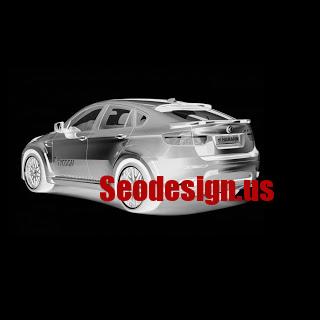
Now the image is ready. You can also add some text with the same Blending Options like the one used for the car.


